Welcome

Just For Fun is my way of sharing all the little things I like to do... from crafty things to thoughtful things!
Showing posts with label tutorial. Show all posts

Tuesday, November 4, 2014

Crochet Hook Roll Tutorial

Yes... we're dragging out the sewing machine again!  Ok, I know you are all like me... all of your crochet hooks are stored neatly by size and type and you can always find your scissors... what?  Why can't you stop laughing?!  :oP 

I hear you, I really do.  On the go, everything ends up in a pile at the bottom of the most organized project bag you could find... been there.

I have a bunch of project bags that I really love but I still need hook rolls. 

I like being able to lay everything out flat, to put my active hook in a separate slot rather than the bottom of the bag, to have room for scissors, and glasses, and to not have to tie it all up in a ribbon (total non-starter if I have to actually tie it.  It just is.  lol)  So here is my favorite, very basic yet effective crochet hook roll.  As usual, I am not a seamstress and therefore I skip all the proper protocols like cutting straight, pressing seams or caring whether it has perfect 90 degree angles.  ;o)

Materials:

Any fabric will do, you'll need about a half yard in total. Mix and match them up just for fun!

3 - 10 in squares, fabric
1 - 10 x 8 inches, fabric
1 - 10 in square, fusible fleece
1- 8 in elastic, I like waistband elastic
Matching thread, scissors, pins, something to measure with

Decide which of the 10 inch squares will be the front (the piece partially hidden by pockets inside) and the back (the part you see when it's rolled up).

Fold the third 10 inch square in half and line it up with the edge of your front piece.  Do the same with the 8 x 10 piece, making sure to fold the 8 inch side in half so the 10 inch side matches your other edges.

Pin the pockets in place at both edges.  This is just going to keep everything in place while we work on the pockets.

Time to whip out that measuring device!
 I personally like the pocket on the far right edge to be about 2 1/2 inches wide so I mark that one first.  That ways it's wide enough to slide a pair of cheaters in there for fine work.  ;o)

Then, I divide the remaining width by 5 and place pins equally.  Each section will be about 1 1/4 inches wide this way... but now is the time to customize it and make it work for you!


Line up your measurement pins and get ready to sew the pockets.  In the photo here you can see the two horizontal pins at the right, holding my pocket fabric in place, and a vertical pin just below the presser foot.

Once you have your aim set, remove that vertical pin!  Do NOT sew over it.

Sew straight down, through all layers, right off the bottom edge.

Do the same for each of the pocket pins across the width of your piece.

It'll look something like this...

Time to remove the pins holding the pocket fabric in place at the edges.  It's not going anywhere now.

Set this piece aside while we switch to the back for a moment.

Grab the piece of fabric you'll be using for the back and the fusible fleece.  They should be roughly the same size, but don't worry about the edges matching up perfectly.

Place them together on your ironing board. The fusible fleece has a rough side and a smooth side.  The rough side should touch your fabric.

Follow the directions on your package - most will say to press on high for a few seconds in each are, starting in the center and working toward the edges.  Keep the iron moving to help prevent scorching.

After pressing, you'll see the two layers have fused together into one thicker piece.  This will help your hook roll keep it's shape as well as add another layer of protection between your tools and the outside world.

What was I saying about the edges don't have to match up perfectly?  ;o)

Now to put the front and the back together!

Place the front and the back together with right sides facing.  Don't worry, we're only going to sew three sides while it's inside out.

Pin the left side and be sure to place pins where your pockets meet the edge to help keep them from rolling and creating weirdness as you sew.

Pin the bottom edge, smoothing all the layers together from the center outward.  Don't worry if the edges are a little crooked as long as they are as close as you can get them without going crazy.

Leave the top completely open, we'll deal with that later.  Now, for the right side... most of this will be pinned normally, but where we have pins at the pocket fabric on the left side, we're going to add that elastic.

It's important to remember that we'll be turning this right side out, so for now, the elastic will actually be in between the layers.

Take the time to place the elastic properly.  Make sure it is between the front and the back, not pocket layers.

Fold the elastic in half, and line the edge up with the edge of your fabric - with the loop sandwiched in between.

Pin the elastic into place.

I've pinned the layers just above and just below the elastic, as well as through the elastic itself.

If you look closely you can see the edge of the elastic under my finger.  The rest of the elastic is lying flat between the layers...

Sew your square!

Start in the top right corner and sew down the right side (be careful over the elastic as it may be especially thick there - you may have to adjust your presser foot).

When you reach the bottom right corner, leave the needle in the fabric, raise your presser foot, and turn your fabric 90 degrees.  This way, you can continue to sew the next edge and maintain a nice crisp corner.

Sew across the bottom, execute another turn, and sew up the left hand side. 

Cut your thread and remove from the machine.  Don't sew the top yet!  ;o)

Trim your seam allowances about 1/4 inch from the thread.  Make sure all pins are removed, threads trimmed and everything is nice and tidy because once we turn it right side out you'll never go back.

Last chance!  lol


Turn the entire piece right side out through the open top. 

You should see your pockets and your elastic
 all properly in place.

If not, now is the time to go back and fix things.

Trim the top edge so that all the layers are fairly even.  it doesn't have to be perfect.


To close the top, fold the front and back edge toward each other and in, so that the topmost edge is actually the fold.

I find pinning each end in place before I start pinning the middle helps me keep it even and flat.

Pin all the way across, leaving no openings.  We'll top seam it closed.

Sew a straight seam through all layers straight across the top edge.  I run two seams about an 1/8 inch apart to make sure I catch all the fabric edges inside.

We're almost there!  One last seam for the flap...

 If it's helpful, put a hook or two inside to help gauge the height.

Fold the top edge down toward the pockets.  I like the flap come down just below the pocket edge - where I am pointing in this fuzzy photo below.


Sorry about that!  My hands were getting tired.  lol  Two hands on the camera is always best.

Anyway, find that sweet spot between how much room you want for your hook height, and keeping them covered.  Fold all the way across, creating a new "top edge" of the roll.

Pin your new top edge in place and sew a top seam across from edge to edge.  This will hold your fold in place permanently.


Now go fill it up!
 
I know it sounds like a lot of steps, but I promise, once you make one, you'll be making one for every project bag. 
 
Ummm... sort of like I did, to match my other project bags by Slipped Stitch Studios.
 
If you're taking your project on the go, may as well have fun doing it!

 
Disney Villains Meet Up at the Haunted Mansion
(fabric at Joann)


Flowers in the Dowager's Garden
(fabrics by c'est_la_viv at Spoonflower)


Vincent Meets the Doctor's Peeps

 
Aliens belong in UFOs (Unfinished Objects)
(fabrics by id_designs at Spoonflower)


Wednesday, October 31, 2012

The Basic Beanie - Built for Speed


Here's the formula for the "basic beanie" or "basic bucket" hat that will fit every time!

I usually use a soft worsted like Caron Simply Soft but you can use any yarn with an appropriate hook.


If you are not sure how to do double crochet stitches, check out the video tutorials.
 
Basic crocheted beanie - worsted weight, H hook
Each round begins with a chain 2 that counts as a dc, and ends with a slip stitch in the top of the chain for joining.

chain 3
Round 1: 12 dc (US double crochet) in 3rd chain from hook, join with slip stitch
Round 2: 2dc in each dc around, 24 dc total
Round 3: * dc in next dc, 2dc (inc) in next dc * around, 36 dc total
Round 4: * dc in next 2 dc, 2dc (inc) in next dc * around, 48 dc total
Round 5: * dc in next 3 dc, 2dc (inc) in next dc * around, 60 dc total (stop increases for kid size)
Round 6: * dc in next 4 dc, 2dc (inc) in next dc * around, 72 dc total (stop increases for most adults)
Round 7: * dc in next 5 dc, 2dc (inc) in next dc * around, 84 dc total (stop increases for really big)

Work rounds evenly: 5 more rounds for kids, 6 for most adults, 7 for really big

Work three rounds of fpdc/bpdc ribbing: Work just like dc rounds, but instead of placing the hook in the top of the stitch below, work alternately around the post of the stitch.

Front post - insert hook from the front (right side), around the post, then to the front
Back post - insert hook from the back (wrong side), around the post, then to the back
Fasten off.

Now that you have the basic formula down, you can adjust based on your preferences - more/less ribbing, longer/shorter sides, etc.

Here's a great rule of thumb on sizing… the diameter of the circle (straight across the widest part) at the end of your increase rounds should be a little less than 1/3 of the final circumference you are going for. So, if we are shooting for these sizes (in inches):

22 men
21 women
20 older kids
19 younger kids
18 toddlers
16-17 babies

The flat circle should have a diameter (in inches) of about:

6.75 men
6.5 women
6.25 older kids
5.75 younger kids
5.5 toddlers
5-5.25 babies

Regardless of how many increase rounds the pattern says, if you stop increasing at these measurements and start working “even” the hat ought to fit ok. This way, you can use any yarn and any hook and still get the sizing where you want it to be!

Here are a few examples of hats I've made using this same basic pattern, and adding a few embellishments.  ;o)


Thursday, May 10, 2012

Line those bags! Part Deux

After my first post about lining, I had a few questions about lining bags with flat round bottoms... like this drawstring bag.

So... here we go with how to line it!

It is faster to have a sewing machine to do the seams (nothing fancy, I promise), but it is not necessary – just substitute hand stitching where I reference the machine.

You’ll need:
A bag: Any size.
Fabric: Depends on the size of your bag. Most will take a half yard or less, but you may want to have more to have extra on hand or add more pockets.
Matching thread
Notions: Scissors, straight pins, sewing needle, sewing machine if you’ve got one.

Step 1: Use your bag as a template to cut your fabric.

Fold fabric so you have two layers overlapping and match the size of your bag. Make sure your bag is as flat as it can be, and leave about a half inch on all sides for seam allowances.

Don’t worry about matching the contours of the bag. We’re going to cut two pieces of fabric, one in a rectangle, which we’ll sew into a cylinder (the lining’s side) and the other a circle (the lining’s bottom).

You can see I cut my fabric right to the top edge of the bag. This will give me a little fabric to turn down at the top for a nice clean edge when sewing it into place.


Step 2: Make pocket (optional) (If you don’t want pockets, skip to step 3)

Cut a piece of fabric in any size that will be convenient for you. Think about whether you want tall or short pockets, and placement inside the bag. Remember to add a half inch in all directions for seam allowances,(i.e. your finished pocket is going to be a half inch smaller in all directions).


Step 2a: Pocket top edge

Create a nice top edge for your pocket by folding it toward the wrong side of your fabric and sewing the edge in place. I use the sewing machine, but it can be hand sewn.

Your fold should be even across the length of the pocket. Pin it in place before sewing if it helps you to keep it even… and just sew a straight line all the way across.

Step 2b: Attach the pocket

Now that you have a nice top edge, we can attach the pocket to the rest of the lining.

Position it where you want it – or in this case, roughly centered onto one half/one side of the lining. Be sure your finished edge is at the top! Fold the left, right and bottom edges toward the wrong side of the pocket fabric, and pin in place.


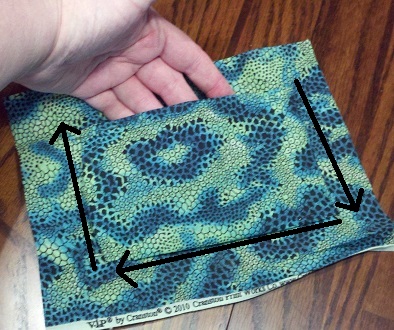
Sew the pocket into place starting at the top right corner and down the right side. Stop your machine while there is a 1/4 inch of fabric remaining, and the needle is still in the fabric. Raise the presser foot and turn your fabric 90 degrees counterclockwise, lower your presser foot and sew the bottom edge into place. Turn again and sew up with left side (black arrows).

Step 3: Side seam

Fold the rectangular piece of fabric in half with right sides together. Make sure that the fabric lies flat, even if it means your edges aren’t absolutely perfect. You can trim away the uneven spots after sewing. Be sure to leave the bottom of your cylinder open.

You still have two pieces, the cylinder for the side, and the circle for the bottom.

Step 4: Sew side to bottom

Pin the right sides of your cylinder/side to the round bottom, and sew into place. Don’t worry if it doesn’t match up perfectly. You can trim it after sewing.


Step 5: Sew lining in place

I hand sew linings into place. I just don’t know enough about the machine to prevent horrible catching, ripping, and ruining of my project by trying to sew lumpy and stretchy handcrafted fabric. Unless you are a seamstress yourself, trust me on this one.

Place your lining inside your bag so your side seam matches up with the center of one side of your bag. Fold down about a half inch of fabric toward the wrong side of the fabric (i.e. between the lining fabric and the bag itself). Pin it into place about a half inch below the lowest edge on your bag (in this case, below the drawstring round).

With your finger, put some tension on the top edge of the fabric to find the opposite side. Fold and pin to the center of the other side of your bag. Continue to pin around the bag in as many or few places as you like. I usually pin toward each base of the handles as well, making six pins total.

Move the bag around and make sure the corners line up ok and everything fits. Adjust your pins if necessary.

Thread your needle, tying both thread ends into a single knot. This will make a double strength thread and give you a little protection if one thread ever breaks. Use a whipstitch to sew the fabric to your bag, being sure to only catch inside loops of yarn (or your thread will show on the outside of your bag and create a ridge). My stitches are a bit smaller than ¼ inch and about the same distance apart. Continue around to where you started, tie off, and enjoy your bag worry free!