After my first
post about lining, I had a few questions about lining bags with flat round bottoms... like this drawstring bag.
So... here we go with how to line it!
It is faster to have a sewing machine to do the seams (nothing fancy, I promise), but it is not necessary – just substitute hand stitching where I reference the machine.
You’ll need:
A bag: Any size.
Fabric: Depends on the size of your bag. Most will take a half yard or less, but you may want to have more to have extra on hand or add more pockets.
Matching thread
Notions: Scissors, straight pins, sewing needle, sewing machine if you’ve got one.
Step 1: Use your bag as a template to cut your fabric.
Fold fabric so you have two layers overlapping and match the size of your bag. Make sure your bag is as flat as it can be, and leave about a half inch on all sides for seam allowances.
Don’t worry about matching the contours of the bag. We’re going to cut two pieces of fabric, one in a rectangle, which we’ll sew into a cylinder (the lining’s side) and the other a circle (the lining’s bottom).
You can see I cut my fabric right to the top edge of the bag. This will give me a little fabric to turn down at the top for a nice clean edge when sewing it into place.
Step 2: Make pocket (optional) (If you don’t want pockets, skip to step 3)
Cut a piece of fabric in any size that will be convenient for you. Think about whether you want tall or short pockets, and placement inside the bag. Remember to add a half inch in all directions for seam allowances,(i.e. your finished pocket is going to be a half inch smaller in all directions).
Step 2a: Pocket top edge
Create a nice top edge for your pocket by folding it toward the wrong side of your fabric and sewing the edge in place. I use the sewing machine, but it can be hand sewn.
Your fold should be even across the length of the pocket. Pin it in place before sewing if it helps you to keep it even… and just sew a straight line all the way across.
Step 2b: Attach the pocket
Now that you have a nice top edge, we can attach the pocket to the rest of the lining.
Position it where you want it – or in this case, roughly centered onto one half/one side of the lining. Be sure your finished edge is at the top! Fold the left, right and bottom edges toward the wrong side of the pocket fabric, and pin in place.
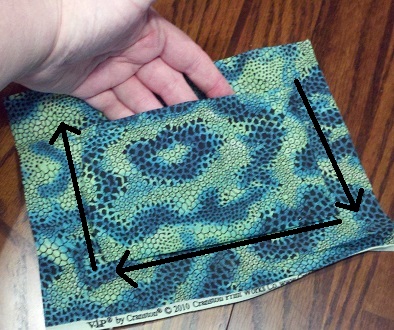
Sew the pocket into place starting at the top right corner and down the right side. Stop your machine while there is a 1/4 inch of fabric remaining, and the needle is still in the fabric. Raise the presser foot and turn your fabric 90 degrees counterclockwise, lower your presser foot and sew the bottom edge into place. Turn again and sew up with left side (black arrows).
Step 3: Side seam
Fold the rectangular piece of fabric in half with right sides together. Make sure that the fabric lies flat, even if it means your edges aren’t absolutely perfect. You can trim away the uneven spots after sewing. Be sure to leave the bottom of your cylinder open.
You still have two pieces, the cylinder for the side, and the circle for the bottom.
Step 4: Sew side to bottom
Pin the right sides of your cylinder/side to the round bottom, and sew into place. Don’t worry if it doesn’t match up perfectly. You can trim it after sewing.
Step 5: Sew lining in place
I hand sew linings into place. I just don’t know enough about the machine to prevent horrible catching, ripping, and ruining of my project by trying to sew lumpy and stretchy handcrafted fabric. Unless you are a seamstress yourself, trust me on this one.
Place your lining inside your bag so your side seam matches up with the center of one side of your bag. Fold down about a half inch of fabric toward the wrong side of the fabric (i.e. between the lining fabric and the bag itself). Pin it into place about a half inch below the lowest edge on your bag (in this case, below the drawstring round).
With your finger, put some tension on the top edge of the fabric to find the opposite side. Fold and pin to the center of the other side of your bag. Continue to pin around the bag in as many or few places as you like. I usually pin toward each base of the handles as well, making six pins total.
Move the bag around and make sure the corners line up ok and everything fits. Adjust your pins if necessary.
Thread your needle, tying both thread ends into a single knot. This will make a double strength thread and give you a little protection if one thread ever breaks. Use a whipstitch to sew the fabric to your bag, being sure to only catch inside loops of yarn (or your thread will show on the outside of your bag and create a ridge). My stitches are a bit smaller than ¼ inch and about the same distance apart. Continue around to where you started, tie off, and enjoy your bag worry free!


 I made CarsLand bags for Christy, Amanda and myself... those are real Lightyear tires as buttons.