Welcome

Just For Fun is my way of sharing all the little things I like to do... from crafty things to thoughtful things!

Tuesday, November 4, 2014

Crochet Hook Roll Tutorial

Yes... we're dragging out the sewing machine again!  Ok, I know you are all like me... all of your crochet hooks are stored neatly by size and type and you can always find your scissors... what?  Why can't you stop laughing?!  :oP 

I hear you, I really do.  On the go, everything ends up in a pile at the bottom of the most organized project bag you could find... been there.

I have a bunch of project bags that I really love but I still need hook rolls. 

I like being able to lay everything out flat, to put my active hook in a separate slot rather than the bottom of the bag, to have room for scissors, and glasses, and to not have to tie it all up in a ribbon (total non-starter if I have to actually tie it.  It just is.  lol)  So here is my favorite, very basic yet effective crochet hook roll.  As usual, I am not a seamstress and therefore I skip all the proper protocols like cutting straight, pressing seams or caring whether it has perfect 90 degree angles.  ;o)

Materials:

Any fabric will do, you'll need about a half yard in total. Mix and match them up just for fun!

3 - 10 in squares, fabric
1 - 10 x 8 inches, fabric
1 - 10 in square, fusible fleece
1- 8 in elastic, I like waistband elastic
Matching thread, scissors, pins, something to measure with

Decide which of the 10 inch squares will be the front (the piece partially hidden by pockets inside) and the back (the part you see when it's rolled up).

Fold the third 10 inch square in half and line it up with the edge of your front piece.  Do the same with the 8 x 10 piece, making sure to fold the 8 inch side in half so the 10 inch side matches your other edges.

Pin the pockets in place at both edges.  This is just going to keep everything in place while we work on the pockets.

Time to whip out that measuring device!
 I personally like the pocket on the far right edge to be about 2 1/2 inches wide so I mark that one first.  That ways it's wide enough to slide a pair of cheaters in there for fine work.  ;o)

Then, I divide the remaining width by 5 and place pins equally.  Each section will be about 1 1/4 inches wide this way... but now is the time to customize it and make it work for you!


Line up your measurement pins and get ready to sew the pockets.  In the photo here you can see the two horizontal pins at the right, holding my pocket fabric in place, and a vertical pin just below the presser foot.

Once you have your aim set, remove that vertical pin!  Do NOT sew over it.

Sew straight down, through all layers, right off the bottom edge.

Do the same for each of the pocket pins across the width of your piece.

It'll look something like this...

Time to remove the pins holding the pocket fabric in place at the edges.  It's not going anywhere now.

Set this piece aside while we switch to the back for a moment.

Grab the piece of fabric you'll be using for the back and the fusible fleece.  They should be roughly the same size, but don't worry about the edges matching up perfectly.

Place them together on your ironing board. The fusible fleece has a rough side and a smooth side.  The rough side should touch your fabric.

Follow the directions on your package - most will say to press on high for a few seconds in each are, starting in the center and working toward the edges.  Keep the iron moving to help prevent scorching.

After pressing, you'll see the two layers have fused together into one thicker piece.  This will help your hook roll keep it's shape as well as add another layer of protection between your tools and the outside world.

What was I saying about the edges don't have to match up perfectly?  ;o)

Now to put the front and the back together!

Place the front and the back together with right sides facing.  Don't worry, we're only going to sew three sides while it's inside out.

Pin the left side and be sure to place pins where your pockets meet the edge to help keep them from rolling and creating weirdness as you sew.

Pin the bottom edge, smoothing all the layers together from the center outward.  Don't worry if the edges are a little crooked as long as they are as close as you can get them without going crazy.

Leave the top completely open, we'll deal with that later.  Now, for the right side... most of this will be pinned normally, but where we have pins at the pocket fabric on the left side, we're going to add that elastic.

It's important to remember that we'll be turning this right side out, so for now, the elastic will actually be in between the layers.

Take the time to place the elastic properly.  Make sure it is between the front and the back, not pocket layers.

Fold the elastic in half, and line the edge up with the edge of your fabric - with the loop sandwiched in between.

Pin the elastic into place.

I've pinned the layers just above and just below the elastic, as well as through the elastic itself.

If you look closely you can see the edge of the elastic under my finger.  The rest of the elastic is lying flat between the layers...

Sew your square!

Start in the top right corner and sew down the right side (be careful over the elastic as it may be especially thick there - you may have to adjust your presser foot).

When you reach the bottom right corner, leave the needle in the fabric, raise your presser foot, and turn your fabric 90 degrees.  This way, you can continue to sew the next edge and maintain a nice crisp corner.

Sew across the bottom, execute another turn, and sew up the left hand side. 

Cut your thread and remove from the machine.  Don't sew the top yet!  ;o)

Trim your seam allowances about 1/4 inch from the thread.  Make sure all pins are removed, threads trimmed and everything is nice and tidy because once we turn it right side out you'll never go back.

Last chance!  lol


Turn the entire piece right side out through the open top. 

You should see your pockets and your elastic
 all properly in place.

If not, now is the time to go back and fix things.

Trim the top edge so that all the layers are fairly even.  it doesn't have to be perfect.


To close the top, fold the front and back edge toward each other and in, so that the topmost edge is actually the fold.

I find pinning each end in place before I start pinning the middle helps me keep it even and flat.

Pin all the way across, leaving no openings.  We'll top seam it closed.

Sew a straight seam through all layers straight across the top edge.  I run two seams about an 1/8 inch apart to make sure I catch all the fabric edges inside.

We're almost there!  One last seam for the flap...

 If it's helpful, put a hook or two inside to help gauge the height.

Fold the top edge down toward the pockets.  I like the flap come down just below the pocket edge - where I am pointing in this fuzzy photo below.


Sorry about that!  My hands were getting tired.  lol  Two hands on the camera is always best.

Anyway, find that sweet spot between how much room you want for your hook height, and keeping them covered.  Fold all the way across, creating a new "top edge" of the roll.

Pin your new top edge in place and sew a top seam across from edge to edge.  This will hold your fold in place permanently.


Now go fill it up!
 
I know it sounds like a lot of steps, but I promise, once you make one, you'll be making one for every project bag. 
 
Ummm... sort of like I did, to match my other project bags by Slipped Stitch Studios.
 
If you're taking your project on the go, may as well have fun doing it!

 
Disney Villains Meet Up at the Haunted Mansion
(fabric at Joann)


Flowers in the Dowager's Garden
(fabrics by c'est_la_viv at Spoonflower)


Vincent Meets the Doctor's Peeps

 
Aliens belong in UFOs (Unfinished Objects)
(fabrics by id_designs at Spoonflower)


Tuesday, September 30, 2014

A Celiac's Day Out


A few months ago I mentioned how frustrating it can be when  people don't take celiac disease seriously.

Add other food and pet allergies and it can be downright scary to go out.  Just to go *out*. 

It's almost impossible to grasp how huge this is.  Just to go *out*.

I can't go to the grocery, the bank, the Doctor, anywhere, without the risk of coming across pet dander.  Think about how many people touch their animals before leaving the house.  Those people are all poison for me.

Look at the photo for a moment.  If I walk into this store, I have to think about which of these people has a pet - and everything they might touch and therefore transfer allergens while in the store.  Expand that to every store, every office, every crowd.

According to The Humane Society, in 2012 62% of American households had at least one pet.  That means in this photo two-thirds of the people I will come in contact with will have some sort of pet dander on them.  My grandkids are all part of that majority too, which means even if their Moms are careful about clean clothes and limiting contact with the dogs... even with a 20mg dose of prednisone, I will still have an allergic reaction after seeing them.  I usually take the next day to sit in my chair, crochet, and moan about it.  :oP  (Poor Steve!)

Adding food allergies on top of that means I also can't eat at most restaurants.  I have to bring my own food everywhere.

Not a big deal you say - I pack my lunch every day.  Sure... but that morning coffee on the go or the treat from the vending machine at 3pm?  Uh-uh.  And unless you made your sandwich bread from scratch it doesn't count.  Haha!

It's true that one meal isn't that tough to cover.  Picnic at the park?  Family BBQ?  Sure, but what about something longer like a weekend away?

I have to begin plotting weeks in advance in order to make everything I need from scratch. 

This year I found the Holy Grail of gluten and major allergen free cookbooks: The Healthy Gluten Free Life by Tammy Credicott of Celiac Maniac fame.  I have tried many recipes from this book and haven't found a single dud.  These recipes actually work, and are good on their own, not just 'ok for allergen free'. 

I also like The Allergy Free Cook Bakes Bread which has a great focaccia recipe.  Yep, you heard me right!  And that crowning glory donut I made for Grandson #2's birthday?  This book.

The third book I use on a regular basis is Gluten Free on a Shoestring Quick & Easy.   She uses prepared flour mixes and a lot of her recipes use egg which is a no-no for me, but I have been able to get away with substitutes, and the Crazy Cake is truly quick & easy.

So if you are still reading... here's how I plan my big day out.

First, I check the freezer, the food allergy sufferer's friend because I can make things in advance and just take one serving at a time out of the freezer.

Sandwich bread - my favorite at the moment is actually a bun made from the Celiac Maniac English Muffin recipe.  I follow all directions in the recipe but bake them in a hamburger bun pan.  As a bun, I can make a cheese sandwich or indulge in the occasional burger.  It is great as morning toast too, so I'll want to take several with me.  This recipe alone is worth the price of the cookbook.

Breakfast - Ever thought about how most breakfast foods have grains?  Not just the obvious breads, cereals, baked goods, but even the flour in that sausage gravy.  Luckily, I can get away with commercial Rice Chex and non-dairy milk (which incidentally travels really well), and perhaps the occasional banana bread (THGFL cookbook).

Anything but another sandwich - Ever tried to eat the same sandwich for every meal four days in a  row?  It's a bigger challenge than it sounds, especially when everyone around you is enjoying a nice meal.  For these times, I try to change it up with some Bean Pie (Called Creamy Quiche from the Food Allergy Survival Guide).  It's not creamy and not even remotely quiche-like but it *is* hearty, filling, easy to carry and eat cold or hot... and *not* another sandwich!  I've taken a slice of this pie into the fanciest restaurants at Disneyland and felt almost normal, enjoying a meal with my husband.

Snacks - Ever tried to have a day out without a single treat?  No dessert, no granola bar, no fruit, no margarita.  Sitting there smiling patiently while everyone else gets to indulge in whatever they like?  Pretending like it's no big deal?  Yeah.  Give me a darn cookie or I swear, blood will be spilt!  :oP 

Thank goodness again for THGFL cookbook and almost completely allergen free recipes for chocolate chip cookies, snickerdoodles, and many more... that actually taste like they are supposed to taste!

Now plan all your meals and get them packed 'cause we're hittin' the road!  ;o)

Thursday, September 25, 2014

Feeling a bit Sassenach!

You know... Sassenach!

I've been enjoying the new Starz series Outlander, based on Diana Gabaldon's book.

To be honest, I got bored with the book.  I loved the concept, time travel is one of my favorites.  Add magic stone circles, Scottish Highlands and political intrigue and you've got me!  Alas,  the story wandered a bit too much for me and I found the ending incredibly predictable.

That said... I always felt a little bad about not liking it as much as everyone else did.  So, I was glad to hear about the TV series, thinking they might cut some of the things that bored me.  So far I have not been disappointed and I love the series.

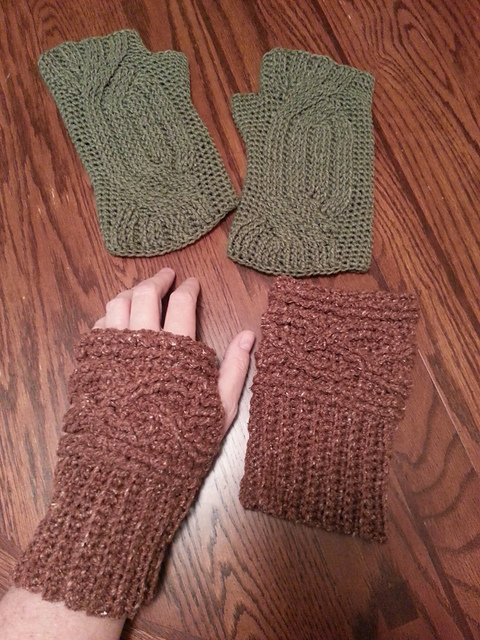
As you can imagine, the costumes provide lots of inspiration for crafters!  I've been inspired by some of the fingerless gloves and "wristers" (wrist warmers aka a tube that can be pulled down over the hands) as shown here.

So I created my own crochet cables... 

First is a wrister in silk/cotton blend Rowan Summer Tweed - Toast, a tube worn over the wrist that can be pulled down over the hands.  But, I did leave thumb slits in mine as an option.  It is worked flat and seamed.

The second is a fingerless glove, with a formal thumb gusset.  It's also a silk/cotton blend,  Knit One Crochet Too's Cozette - Moss.  It's worked in the round.


Add a tunisian crochet tam, a cabled scarf... and I am ready to join Clan Mackenzie!  Just don't tell my Edinburgh ancestor John Knox.  ;o)

Here are a few more photos of these projects...


Friday, September 5, 2014

Please Hear What I'm Not Saying


Sometimes it's tough to say what we mean and mean what we say.  Over the years I've learned to listen to what a person is *not* saying and to try to let that message be louder than what they *are* saying.  In large part, because as a teen I heard this poem, and it helped me find a new perspective.

Please Hear What I'm Not Saying

Don't be fooled by me.
Don't be fooled by the face I wear
for I wear a mask,
a thousand masks,
masks that I'm afraid to take off,
and none of them is me.

Pretending is an art that's second nature with me,
but don't be fooled,
for God's sake don't be fooled.
I give you the impression that I'm secure,
that all is sunny and unruffled with me, within as well
as without,
that confidence is my name and coolness my game,
that the water's calm and I'm in command
and that I need no one,
but don't believe me.
My surface may seem smooth but my surface is my mask,
ever-varying and ever-concealing.
Beneath lies no complacence.
Beneath lies confusion, and fear, and aloneness.
But I hide this. I don't want anybody to know it.
I panic at the thought of my weakness exposed.
That's why I frantically create a mask to hide behind,
a nonchalant sophisticated facade,
to help me pretend,
to shield me from the glance that knows.

But such a glance is precisely my salvation, my only hope,
and I know it.
That is, if it's followed by acceptance,
if it's followed by love.
It's the only thing that can liberate me from myself,
from my own self-built prison walls,
from the barriers I so painstakingly erect.
It's the only thing that will assure me
of what I can't assure myself,
that I'm really worth something.
But I don't tell you this. I don't dare to, I'm afraid to.
I'm afraid your glance will not be followed by acceptance,
will not be followed by love.
I'm afraid you'll think less of me,
that you'll laugh, and your laugh would kill me.
I'm afraid that deep-down I'm nothing
and that you will see this and reject me.

So I play my game, my desperate pretending game,
with a facade of assurance without
and a trembling child within.
So begins the glittering but empty parade of masks,
and my life becomes a front.
I tell you everything that's really nothing,
and nothing of what's everything,
of what's crying within me.
So when I'm going through my routine
do not be fooled by what I'm saying.
Please listen carefully and try to hear what I'm not saying,
what I'd like to be able to say,
what for survival I need to say,
but what I can't say.

I don't like hiding.
I don't like playing superficial phony games.
I want to stop playing them.
I want to be genuine and spontaneous and me
but you've got to help me.
You've got to hold out your hand
even when that's the last thing I seem to want.
Only you can wipe away from my eyes
the blank stare of the breathing dead.
Only you can call me into aliveness.
Each time you're kind, and gentle, and encouraging,
each time you try to understand because you really care,
my heart begins to grow wings--
very small wings,
very feeble wings,
but wings!

With your power to touch me into feeling
you can breathe life into me.
I want you to know that.
I want you to know how important you are to me,
how you can be a creator--an honest-to-God creator--
of the person that is me
if you choose to.
You alone can break down the wall behind which I tremble,
you alone can remove my mask,
you alone can release me from my shadow-world of panic,
from my lonely prison,
if you choose to.
Please choose to.

Do not pass me by.
It will not be easy for you.
A long conviction of worthlessness builds strong walls.
The nearer you approach to me
the blinder I may strike back.
It's irrational, but despite what the books say about man
often I am irrational.
I fight against the very thing I cry out for.
But I am told that love is stronger than strong walls
and in this lies my hope.
Please try to beat down those walls
with firm hands but with gentle hands
for a child is very sensitive.

Who am I, you may wonder?
I am someone you know very well.
For I am every man you meet
and I am every woman you meet.

Charles C. Finn


Thursday, August 21, 2014

Random Act of Art!


Have you ever heard of a yarn bomb?
 
It is an amazing way for yarn crafters to make people smile in a colorful, creative, artful way.  Some of them are really amazing... like the octopus tree or the lacey chain link fence or the mystery knitter at the London Olympics.
 
These aren't just crafts though... this is art!
 
I decided when we had a family camping trip over the summer that I would try my hand at a yarn bomb.
 
I thought long and hard about it, about my impact on the environment, trees and wildlife, and for the rangers who might feel obligation to take down what I put up.
 
I decided on crocheted birdhouses... writing this reminder on the bottom of one to show my good intentions.
 
As Steve and our kids and grandkids hiked, and fished, and played... I stayed at the campsite crocheting oddly shaped pieces out of the crazy assortment from my oddball bin - you know the few yards left after you finish another project but think "I might need this someday"?
 
Someday's here!
 
I used non-toxic glue to help keep the pieces in place, added loops for hanging, and enlisted my daughters help in hanging everything.
 
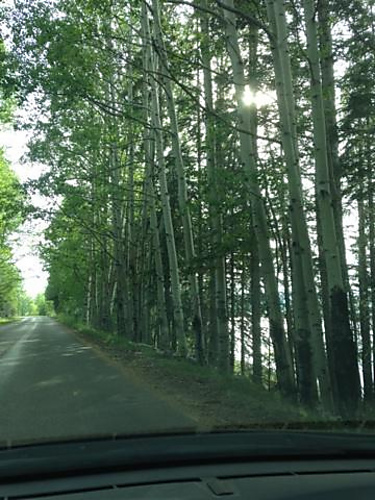
The campground has a gorgeous tree lined road, and they decided to spread our Random Act of Art along this section.
 
As people pass this way, they might see a yarn covered ornament swaying in the breeze, or a brightly colored birdhouse... and I hope they smile.
 
Many thanks to my daughters Christy and Amanda for making this happen!


I enjoyed the project so much that I made one more tiny crocheted birdhouse to hang in the Gramma Tree.  Cute, eh?